Some of us learn by simply reading from a textbook, others learn by hearing directions aloud, but many of us learn from hands-on exposure to a task or concept presented to us.
Vowin teamed up with Cleveland-based medical start-up company Centerline Biomedical, Inc. to aid in their demonstration and explanation of their product and its value. Centerline Biomedical, Inc. is commercializing a novel surgical navigation technology aimed at vastly improving the precision, safety, and control in minimally invasive endovascular procedures.
Centerline Biomedical requirements:
- Transparent model that allows surgeons to see tools in practice
- Display movement of the apparatus going inside the aorta
- Durable model to withstand multiple shipments and demonstrations
- Create a high-quality, visually accurate model
Today, when a patient receives a stent or stent-graft, surgeons use X-ray fluoroscopy for navigation, which provides a poor form of visualization and subjects patients and caregivers to dangerous ionizing radiation. Centerline’s IOPS technology is designed to give surgeons high resolution color 3D imaging without using ionizing radiation.
Essential to the success of a young high-tech start-up is the ability to demonstrate the technology to potential investors, customers and other stakeholders, and Centerline looked to The Technology House to fulfill their need of a portable and rugged version of their technology and demonstration pieces. With their 22-year history in creating vowin.cn/' target='_blank'>rapid prototype models for demonstrations, The Technology House was able to provide insight and information to Centerline Biomedical, Inc.
“The Technology House leveraged its rapid prototyping capabilities in Stereolithography to 3D print a vascular phantom and electronics housings exquisitely suited to our needs.”
– Vikash Goel, Chief Technology Officer
Centerline Biomedical envisions these demo prototypes eventually leading to product lines for training and educational use.
The Challenge: Create an Aesthetic, Durable Model in a Clear Paintable Material
After reviewing Centerline’s requirements and the 3D CAD file, one of our Project Managers met with our Additive Engineers and decided the best solution was to section the file to 3D print in the Stereolithography (SLA) technology of high resolution, accuracy, easy of finish, paint, and assembly.
Step 1: Section the File for 3D Printing in the SLA process
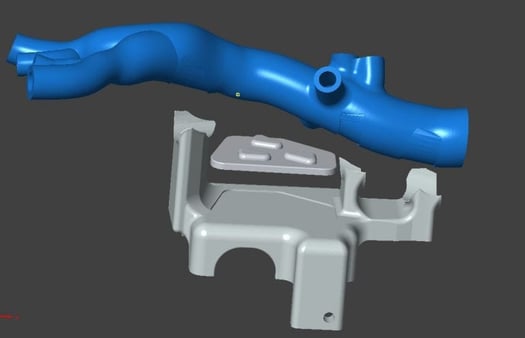
Using the Magics Software by Materialise, our Additive Engineers were able to bring in the provided 3D CAD file and make customized part breaks that allowed for the best parts to build, finish, paint and assemble.

3D CAD file sectioned via Magics
Step 2: 3D Print Parts in SLA ClearVue SL 7870
After sectioning the files, we were able to orientate and add supports as needed, which allowed us to layout the part perfectly on our 20’’ x 20’’ build platforms. Parts were then built by a UV laser tracing the part images layer by layer, or “slicing” the part at .005’’ increments, over and over until the build was complete. Parts were ready for the next steps in 1 business day.
Step 3: Prepare Parts for Paint
Once the parts finished printing, they went through a standard cleanup which includes: support removal, wash and UV oven cure. Parts are then lightly sanded to remove any support remnants and sand blasted. This is the standard SLA part finish. To prep a part for painting (or as we call it, a Paint Ready Finish), the parts are sanded to remove all the build layer lines. For the clear part, we wet sand the part because the clear shows imperfections such as scratches that then require post-paint buffing. From there any non-clear parts are primed and ready for paint.
Step 4: Paint Parts
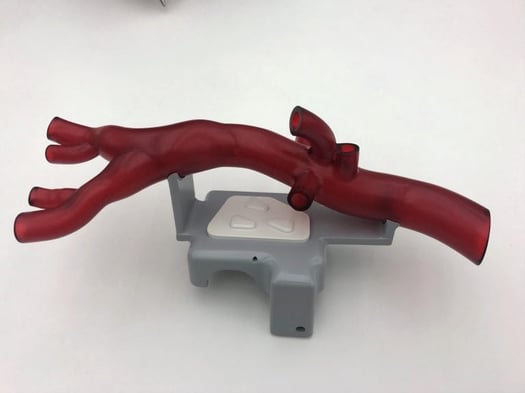
For paint, we had three total parts. By painting the parts separately, it improved the overall process and look of the parts because we did not have to hand mask the model multiple times. If you have ever painted your home, you know this is the toughest and most tedious part of painting and it never comes out perfect the first time. The base was painted gray. The keypad was painted white. Both received a light texture to hide any small imperfections. The main aorta part needed to be painted clear with a red tint, not an easy task, but using our in-house custom color match system, we were able to customize a red tint clear paint. This allowed the parts to be red, but also see-through when used for demonstrations. After drying the aorta part was buffed and all parts were ready for next step.
Step 5: Assemble Parts
After all the parts were painted, the parts needed to be re-assembled together into a finished model. When sectioning the parts in the Magics software, we were able to add tolerance for the superglue leaving room for the parts to assemble perfectly without a big mess of excess glue.
Final Painted Aorta Model
Step 6: Create Custom Reusable Shipping Package
The last step was to ensure the parts held up from demo to demo when shipped across the world. To do this, we used the CAD file to custom cut foam inserts that would fit into a box. This allowed ease of packaging and confidence that the part would show up perfect every time.
In the end, Centerline’s model is what we do at Vowin every day. Our Project Managers and Engineering Team work together with customers to fully understand requirements of the project and even offer new solutions from our diverse in-house services, to exceed customer expectations.


