
Plastic parts are everywhere, and injection vowin.cn/en/News/news1251.html' target='_blank'>vowin.cn/' target='_blank'>molding is the most widely used manufacturing process for making them.
It’s easy to see why: in addition to its material versatility, injection molding is a highly cost-effective process for manufacturing in large quantities, with a single mold sometimes used over a million times with no visible loss of quality. For mass production of plastic parts, there are few better alternatives.
So what exactly is injection molding? How does it work and why is it so popular? What kind of materials can be used for injection molding, and what kind of plastic parts can be created with those materials? And most importantly: should you and your business consider injection molding as a means of production?
This 3ERP guide attempts to give a comprehensive overview of injection molding, explaining the technical process, its most common uses and various other aspects of the world’s most popular plastic production technology.
If you have never encountered injection molding before, the easiest way to understand the process is to consider its two constituent terms: injection and molding.
Unfortunately, we first need to swap those words around and start with the latter term: molding.
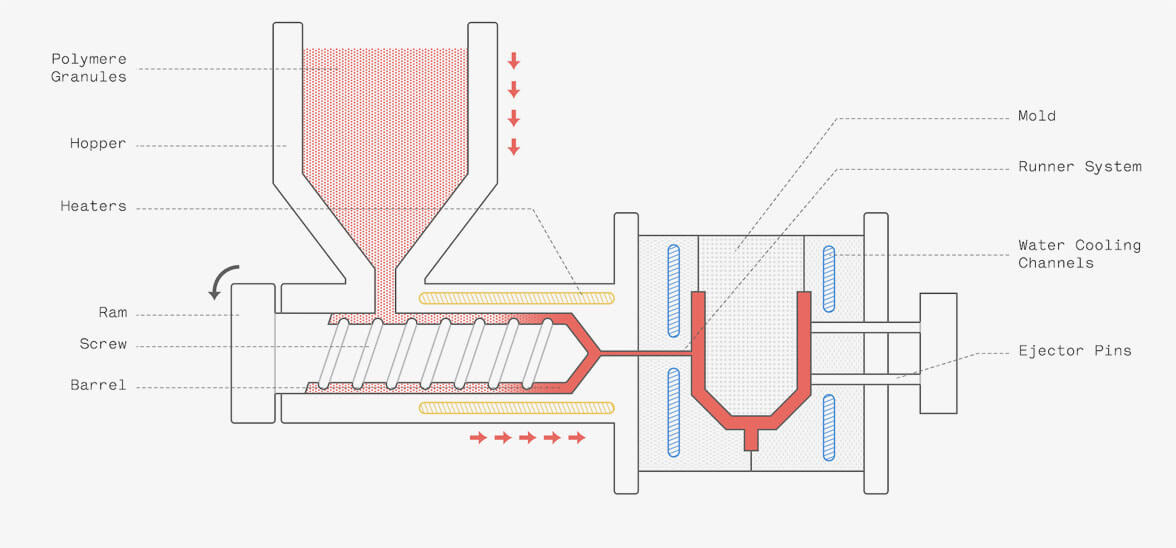
At its core, the injection molding process involves the use of two or more pieces of metal tooling, which together function as a mold. The mold — which is not an end-use part, but a component of the manufacturing equipment — contains a shaped cavity that ultimately gets filled with molten plastic.
And that’s where the injection part comes in. Once a mold has been created, an injection molding machine squeezes or 'injects' molten plastic into it, where the plastic cools and solidifies. When the plastic has fully solidified, the mold is opened up and the now-solid piece of plastic can be popped out. This piece of plastic, shaped like the cavity of the mold, is the finished molded part.
Because the molten plastic is forced into the mold at pressure, and because it can be artificially cooled in order to solidify quickly, the injection molding process is very fast. And once a part has been made, another dollop of molten plastic can be injected into the mold straight away.
The process repeats over and over until the required quantity of parts has been made.
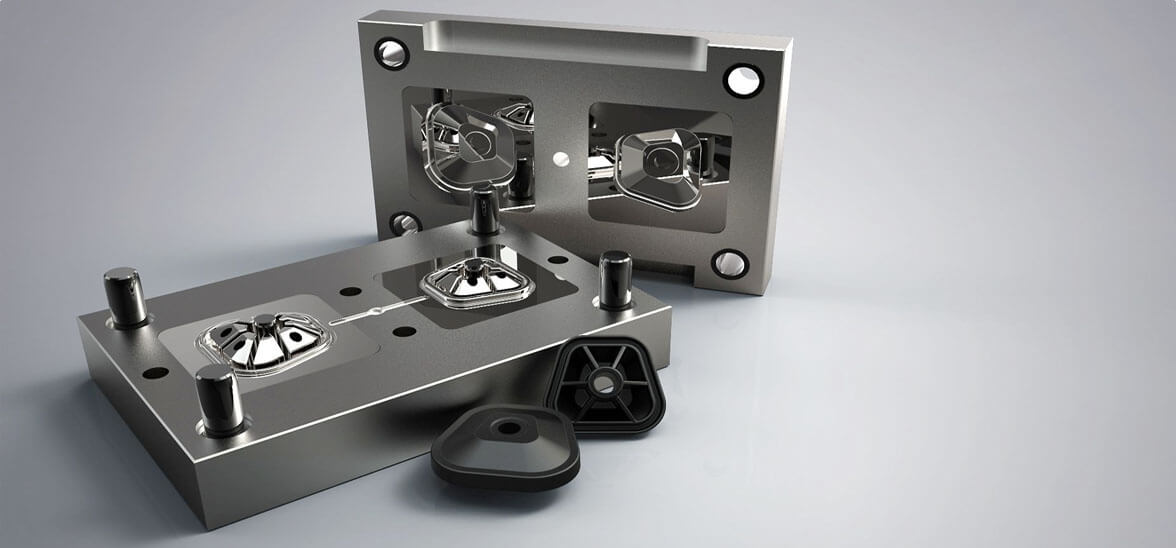
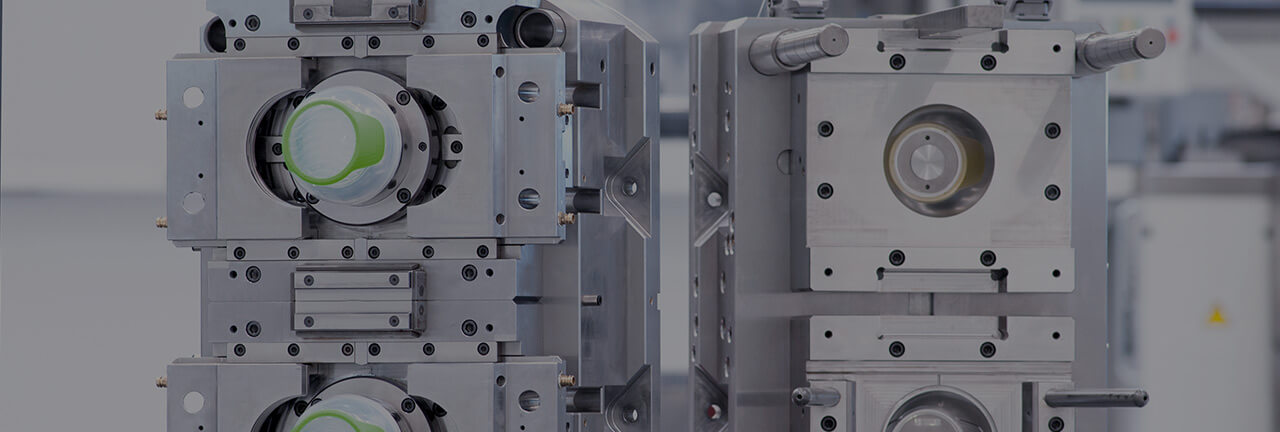
The mold used in injection molding is a piece of custom tooling formed of two or more pieces of metal, usually made of steel or aluminum.
The purpose of the mold is to create a hollow cavity into which molten plastic can be injected in order to form a part. The mold must therefore be an inverted version of the part, with the hollow cavity having the actual shape of the part.
Although their job seems straightforward, molds are surprisingly complex pieces of equipment. That’s because they must actually perform two roles: first, forming the plastic part; and second, allowing that plastic part to be ejected without getting damaged.
Creating a mold in two separate sections makes it easy to make and then eject the part. In most cases, a mold for injection molding consists of two main sections: a core plate, which features a protrusion, and a cavity plate, which features a cavity. These two sections are positioned so a gap — the mold cavity — forms between them. (Confusingly, the cavity plate is often referred to simply as the 'cavity'.)
For especially complex parts — those with overhangs, for example — the mold may be divided into more than two sections.
Each section of the mold has a particular role. The molten plastic is injected into the mold cavity via a sprue and channels in the cavity plate. Then, when the plastic solidifies, the core plate is pulled away from the cavity plate, taking the plastic part with it. The part can then be gently released from the core plate using small rods known as ejector pins. These pins sometimes leave small round marks on the core side of the part.
Steel molds have a longer lifespan than aluminum molds, and are consequently more expensive to make. Regardless of material, molds are typically made using CNC machines, though recent improvements in additive manufacturing have provided a new way to create short-lifespan prototyping molds.
Tooling materials available from 3ERP include:
Both steel and aluminum molds have particular benefits for injection molding. Although steel is generally considered the more robust choice, there are many instances in which aluminum may be preferred.
Choosing between steel and aluminum depends on factors such as:
In general, steel molds are more suitable when dealing with abrasive plastics and very large quantities of parts, since they are tougher and have a longer lifespan than aluminum molds.
Aluminum molds, however, are more affordable and can sometimes be fabricated faster than steel molds, since aluminum is a highly machinable metal.
Now that we’ve established what a mold is, it’s time to look at how the entire injection molding process works.
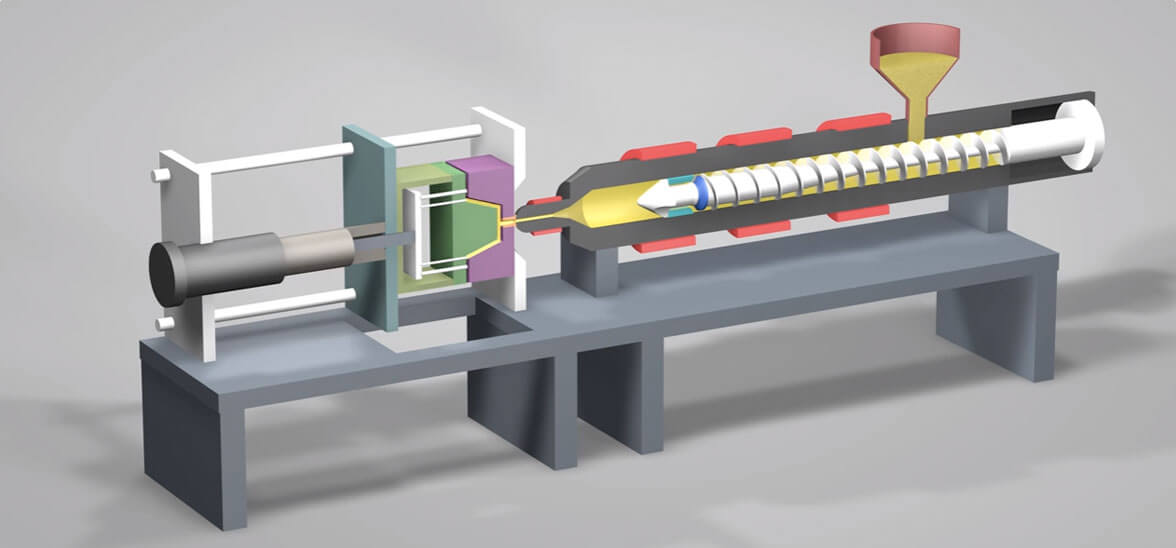
The entire process is carried out using a piece of equipment known as an injection molding machine (or injection molding press), which consists of two main sections:
For clarity, we can break the injection molding process down into six main stages.
Although this is more of a preliminary step, the first part of injection molding involves preparing the metal tooling that will be used as the mold. Molds are generally designed on a computer using Computer Aided Design (CAD) software, then fabricated from metal using CNC machines.
When designing a part for injection molding and consequently designing its metal mold, certain design principles must be followed to prevent defects.
Another preliminary step involves readying the raw injection molding material, which is usually a thermoplastic in pellet form. These pellets may need to be mixed with colored dyes before molding begins.
When the mold has been fabricated, it must be fitted securely into the clamping unit of the injection molding machine. The unit squeezes the core plate and cavity plate together, ensuring that no molten plastic can escape between the two sections.
On the injection unit of the injection molding machine, raw plastic pellets are contained in a hopper — a tapered container that can dispense pellets into the machine as required.
When the mold is ready, these pellets are dispensed from the hopper into an oblong section underneath called a barrel, where they are heated into a molten state. The barrel contains a ram or reciprocating screw, which forces the material toward the mold while simultaneously heating it up.
The molten plastic exits the heated barrel through a nozzle and into the mold cavity via a sprue — a long channel built into the mold that allows material to enter.
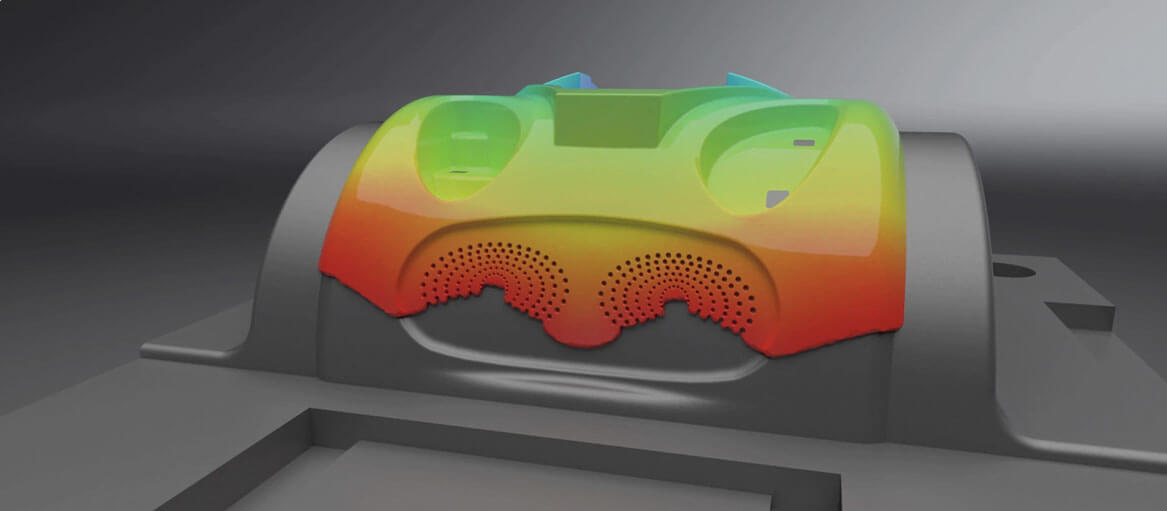
When the entire 'shot' of molten plastic has been injected into the mold cavity, it begins to cool and harden. This is because the metal mold is much cooler than the heated barrel where the plastic pellets are melted down. As the plastic part hardens, it also exhibits some degree of shrinkage — a factor that must be accounted for during part design.
When the plastic part has fully cooled and solidified, the mold can be opened up. During this stage, the core plate is pulled away from the cavity plate, before ejector pins are pushed into the plastic component to disengage it from the core.
When the plastic component has been removed from the mold, the two halves of the mold can be clamped together again, ready for the next shot.
When the part has been removed from the mold, it may need to be painted or subjected to surface finishing procedures. The part may also be joined to other (molded or non-molded) parts to form a complete product.
There are many reasons to choose injection molding over another plastic manufacturing process like 3D printing or vacuum casting. Some of the biggest advantages of injection molding include:
The more injected molded parts you make, the cheaper your cost per unit becomes. That’s because the biggest expense is making the metal mold — and once you’ve got the mold, simply filling it up with plastic is relatively inexpensive.
Speed is another reason why injection molding is great for making parts in large quantities. A shot of plastic can be injected and cooled in a matter of seconds, allowing for fast turnarounds of very large orders.
The best materials for injection molding are thermoplastics, while thermosets, elastomers and composites can also be used. Within those categories, there is a wide array of potential plastics suitable for a wide range of applications.
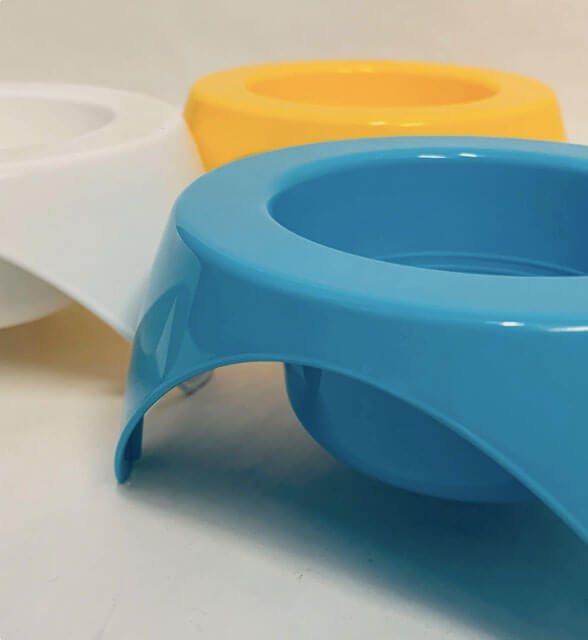
The raw plastic pellets used for injection molding can be mixed with dyes for easy and consistent coloration of a molded part.
Although there are design limitations for injection molding, it is still possible to create complex parts with intricate features. As long as the material is injected with enough force, it can reach even the smallest gaps in the mold cavity.
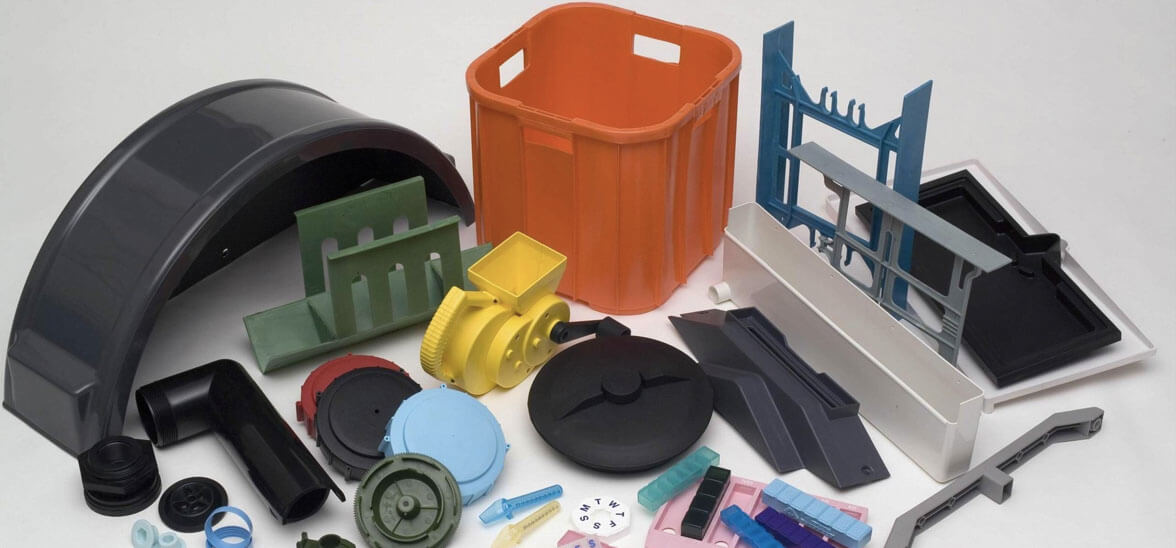
Injection molding is the world’s most widely used manufacturing process for plastic parts. As such, it is used for a huge variety of different parts and products.
The applications of injection molding are largely determined by the major advantages and disadvantages of the process, as well as its technical and dimensional limitations.
For instance, injection molding can be used to produce huge volumes of parts at a low cost, but is generally limited to thermoplastics, which are weaker than most metals. This means injection molding is often used for commonplace but low-strength items like food packaging, containers and general consumer goods.
Although it would be impossible to list every possible use of injection molding, these are some of the more common applications of the process:
Billions of plastic bottles are made by injection molding each year, making them the most widely injection molded product of all. Most water and soft drink bottles are made from polyethylene terephthalate (PET).
Simple plastic objects such as containers, garbage bins, kitchenware, electric air fresheners and even toilet seats are some of the many household goods made using injection molding.
Not all injection molded parts are cheap or disposable. Car parts like bumpers, dashboards and cup holders are often made with injection molding, and can therefore be made in massive quantities to fulfill the needs of automotive suppliers.
Essential medical products like syringes, trays and tubes can be injection molded, since a range of medically safe plastics can be used in the manufacturing process.
Most buildings aren’t made of plastic, but injection molding can be used to fabricate many construction parts, including vents, gaskets, conduits, insulators and flooring panels.
Many thermoplastics are excellent electrical insulators, making them ideal for molded housings used in electronic items.
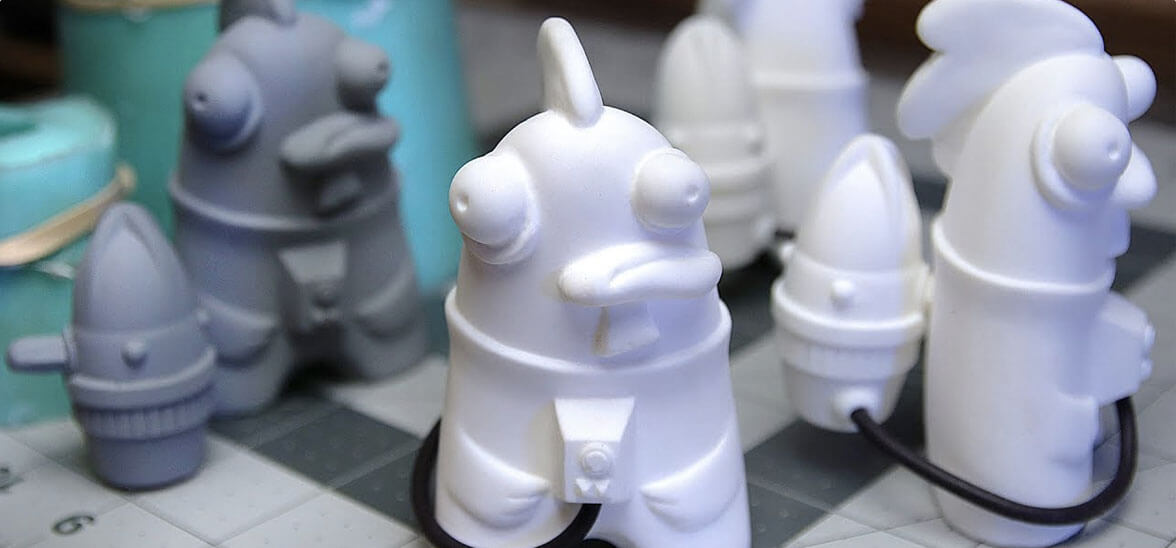
Most plastic toys are made using injection molding. The simplest of these toys may not even require painting or tinting, since raw plastic pellets can be acquired in a variety of bright colors.
Injection molding is versatile, but it’s not suitable for every part or product. With some exceptions, these parts may be better suited to an alternative process:
Injection molding is very cheap in large quantities, but very expensive in small quantities — because metal tooling costs so much more than shots of plastic pellets. Short-run production is feasible, but single items may be more suitable for 3D printing.
Injection molded parts cannot be filled with complex internal geometries, since it would be impossible to create an ejectable mold with interior sections.

Materials used for injection molding can be sorted into four main categories: thermoplastics (most common), thermosets, elastomers and composites.
Injection molding materials available from 3ERP include:
The size of the injection molding machine determines the maximum mold size and consequent maximum part size. Standard machines can generally handle molds up to 500 x 750 mm, with depths of no more than 100 mm from the parting line — the border between the injection mold and ejector mold.
Tolerances for injection molded parts depend on machinery, part complexity and material. For tighter tolerances, however, customers can demand precision molding at added cost.
As a rough guide, standard tolerances for most materials may be around 0.2 mm, though tolerances as tight as 0.05 mm may be possible with some materials and parts.
Designing parts for injection molding isn’t difficult, but certain rules and principles must be followed to ensure that the mold fills up properly, that the part can be removed successfully and that no defects occur.
Possible defects during injection molding include warping, sinking and breakage. However, these problems can be easily avoided if the manufacturing process is considered early on in the part’s design stage.
These injection molding design guidelines are a good place to start when creating injection molded parts.
Consistent wall thicknesses
Using thin walls on molded parts (2 mm or less) reduces cycle times. But keeping walls consistent is just as important: uneven walls lead to uneven cooling, which can lead to warping and twisting of the part.
Draft angles
Draft is when a part is designed to be tapered instead of straight. 1-2 degrees of draft reduces stress and makes a finished part easier to eject from the mold.
Ribs and gussets
Ribs are pillar-like structures that join two walls, and are the best way to accommodate 'thick' sections without using thick walls. They should be no thicker than 60% of the wall thickness of the part. Gussets are triangular support structures that reinforce perpendicular sections.
Sharp corners
Sharp corners invite stress concentration and can easily break. Incorporating radii into these sections reduces stress and the chance of part failure. Rounded corners also improve material flow within the mold.
Thick sections
Molded parts with unnecessarily thick areas are highly susceptible to warping, sinking and other defects. Thick areas should be hollowed out and supported with ribs if necessary.
Undercuts
Undercuts are protrusions that stop a part being ejectable from a two-plate mold. They should be avoided altogether if possible, although techniques like shutoffs, bumpoffs and multi-part molds can be used to deal with them.

Overmolding, sometimes referred to as two-shot molding, is a way of creating complex injection molded parts containing multiple materials or colors. The process involves creating a molded part, then, when it has solidified, adding another shot of material to create a second layer around the existing section.
When executed correctly, overmolding can produce multi-material, multi-color parts such as rigid plastic pens with soft elastomer grips.
Overmolded parts are often stronger than multi-section parts that have been assembled with glue or other fastening techniques. Because the outer surface of the inner molded part is softened by the presence of the second material shot, chemical bonding can occur between the two materials, leading to a stronger part. However, only certain material combinations can produce adequate bonding.
Alternatively, a related process called insert molding can be used to create complex parts that are part metal, part plastic. During the insert molding process, a metal 'insert' — created using CNC machining or another method — is placed within a mold, before a shot of plastic material is injected to encase it or add an exterior plastic section.
Although it has several uses, insert molding can be particularly useful for incorporating metal threads within a plastic part.
Injection molding is typically described as a cost-effective manufacturing process… when ordering large quantities of parts.
The reason for this is simple: with injection molding, the initial tooling costs are very high, while the actual plastic molding costs are very low, which means the effective cost-per-unit becomes lower when more units are required.
For example, imagine that a stainless steel mold for a toy car costs $5,000, and each plastic toy car made with the mold costs $0.50. In this scenario, ordering 1x unit of the toy car would cost $5,000.50, ordering 2x units would cost $5,001, and ordering 1,000x units would cost $5,500.
In all of the scenarios, the mold accounts for the bulk of the cost, so the total cost does not vary greatly.
However, in these three scenarios, the effective cost-per-unit does vary greatly:
|
Scenario in which mold costs $5,000 and each molded part costs $0.50 |
||
|
Units |
Total cost ($) |
Cost-per-unit ($) |
|
1 |
5,000.50 |
5,000.50 |
|
2 |
5,001.00 |
2,500.50 |
|
1,000 |
5,500.00 |
5.50 |
As you can see, there is a dramatic reduction in cost-per-unit when the unit quantity increases, since the extra units amortize the high cost of the mold. Ordering more units of the toy car clearly represents better value for money. (In fact, ordering a single unit would appear to be a colossal waste of money.)
But just how "large" do we mean when we say that injection molding is suited to large quantities of parts? 100? 1,000? 10,000? A million? As a company deciding between multiple manufacturing processes for a medium-size order of prototypes or end-use parts, we want to know at what point injection molding becomes more cost-effective than the alternatives such as 3D printing.